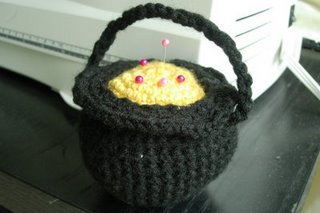
Final Product
Supplies
A small amount of worsted weight yarn in black
A small amount of worsted weight yarn in the color of you choice
G/6 (4.00 mm) crochet hook
Fiberfill
Yarn needle
Instructions
Cauldron
Round 1: Ch 2, 10 sc in 2nd ch from hook, or 10 sc in a magic loop.
Round 2: 2 sc in each sc around.
Round 3: (Sc in next sc, 2 sc in next sc) around.
Round 4: (Sc in next 9 sc, 2 sc in next sc) around.
Round 5: (Sc in next 10 sc, 2 sc in next sc) around.
Round 6: Sc in each sc around.
Round 7: (Sc in next 11 sc, 2 sc in next sc) around.
Round 8: (SC in next 12 sc, 2 sc in next sc) around.
Rounds 9-11: Sc in next sc around.
Round 12: (Sc in next 12 sc, skip next sc, sc in next sc) around.
Round 13: (Sc in next 11 sc, skip next sc, sc in next sc) around.
Round 14: (Sc in next 10 sc, skip next sc, sc in next sc) around.
Round 15: Working in back loops only, sc in each as around.
Round 16: Working in back loops only, (sc in next 2 sc, 2 sc in next sc) around.
Round 17: Working in back loops only, (sc in next 3 sc, 2 sc in next sc) around.
Fasten off.
Handle
With 2 strands of yarn, and leaving a long tail, ch 25.
Fasten off, leaving a long tail on this end, as well.
Potion
Round 1: Using the colored yarn of your choice, ch 2, 10 sc in 2nd ch from hook or 10 sc in a magic loop.
Round 2: 2 sc in each sc around.
Round 3: (Sc in next sc, 2 sc in next sc) around.
Round 4: (Sc in next 4 sc, 2 sc in next sc) around.
Round 5: Sc in each sc around.
Fasten off.
Finishing
There is no need to weave in ends, you can simply tuck them inside the cauldron before you stuff it.
Take one end of the handle in your hand.
Take each tail end of the side of the handle that you are holding and thread them through the fold where the lip of the cauldron begins, placing one tail on each side of a sc.
Tie the in a knot on the inside of the cauldron.
Repeat the process for the other end of the handle directly across from the first handle attachment.
With black yarn and the yarn needle stitch up and down to pin the lip to the cauldron. Try to stay near the inside edge so that the outside edge of the lip still sticks out a little.
Author's Note: If you don't do this step and then you stuff it the lip sticks up like flower petals, instead of like the edge of a cauldron.
Place the potion where you want it inside the cauldron.
With yet more black yarn and the yarn needle sew down through the inside edge of both the cauldron and the potion edge.
Now sew up through the next stitch in the potion and up through the cauldron lip, pulling snug. The potion edge should tuck up under the cauldron lip so that you cant see the stitches.
Work your way around the potion in this manner until there is only a small gap left.
Stuff the cauldron as firmly as you can with the fiber fill.
Finish stitching in the potion.
Squish the cauldron around until to looks like it's the right shape.
Credit
© Pren Wilcox. Tutorial posted with permission and taken from wilcoxwizardwears.blogspot.com.


