Supplies
Paper cutter
Bone folder
Scraps of white cardstock
Wing It stamp set, or a wing stamp
French Flair background stamp, or a swirly/twirly background stamp
Bashful Blue Classic Stampin' inkpad, or any light blue water-based dye ink
Paper snips
Ticker Tape Alphabet stamp set, or comparable alphabet stamp set
1 1/4" or 1 3/8" (3.18 cm or 3.51 cm) circle punch
Embossing buddy, or anti-cling dryer sheet
Tweezers, preferably cross-locked
Versamark ink pad
Work surface protector like acid-free grid paper
Gold embossing powder
Powder Pal or a sheet of scrap paper
Individual House Supplies
Gryffindor
1 sheet of Bravo Burgundy or a red or burgundy card stock, 8½" x 11" (21.59 cm x 27.94 cm)
Whisper White Craft Stampin' or white pigment ink pad
So Saffron Classic Stampin' or gold-ish water-based dye ink pad
Hufflepuff
1 sheet of Summer Sun or yellow cardstock, 8½" x 11" (21.59 cm x 27.94 cm)
Basic Black Craft Stampin' or black pigment ink pad
Ravenclaw
1 sheet of Night of Navy or navy blue or blue card stock, 8½" x 11" (21.59 cm x 27.94 cm)
Very Vanilla Craft Stampin' or ivory pigment ink pad
Creamy Caramel or Going Gray Classic Stampin' or bronze or light grey water-based dye ink pad
Slytherin
1 sheet of Handsome Hunter or green card stock, 8½" x 11" (21.59 cm x 27.94 cm)
Whisper White Craft Stampin' or white pigment ink pad
Going Grey Classic Stampin' or grey water-based dye ink pad
Author's
Note: The author used Stampin' Up! supplies to make these cards. Please
note that you may substitute them by supplies made by other company and
achieve similar results.
Instructions
Take
the 8½" x 11" (21.59 cm x 27.94 cm) sheet of card stock in the house
color of your choice and cut it into two 8½" x 4½" (21.59 cm x 11.43
cm) pieces.
You will only need one of the pieces to make your card.
Score the card in the middle using your bone folder and fold in half.
Ink the French Flair background stamp using the pigment ink written above for your house.
Author's Note:If you are using Stampin' Up supplies, make sure to not ink the top part (one of the bird and the top swirls).

Stamp your card in the bottom-right corner.

Using the wing stamps in the Wing It stamp set, stamp two left wings and two right wings in light blue water-based dye ink on the white card stock scrap paper.

Cut out the shapes, making sure to leave a tiny white border.
Punch out two circles using your circle punch.
Rub your embossing buddy or dryer sheet over your Powder Pal tray or scrap paper and one side of the circle and ink that same side in Versamark.
While
the circle is still on the ink pad, run your finger over the back of
circle to make sure it is completely inked, then use the tweezers to
grab a small corner of the circle and pick it up.
Still holding the circle in the tweezers, pour embossing powder over your circle, collecting the excess powder in your Powder Pal tray or your sheet of scrap paper.

Emboss
the powder until it changes consistency, then quickly pour some more
powder while the other coat still hasn't dried up and re-emboss.
Author's Note: If you're not quick enough or think that you won't be, re-ink in Versamark before pouring some more powder.
Add more coats if desired.
Pour the excess powder from the Powder Pal tray or on the paper scrap back into its jar.
Using your chosen alphabet stamp set, stamp the letters "P", "l", "a" and "y" on your scrap card stock.
Author's
Note: You don't need to stamp the letters evenly, as you will be
cutting them out individually. If you don't stamp a letter correctly,
just stamp it again. You don't need to redo all the letters.
Once you have all the letters, cut them out individually with your paper snips.
Assembly
Take
one left wing, turn it over so you only see the white cardstock, add
some glue on the bottom part and stick it on the gold side of one of
the circles, where you placed your tweezers earlier on.
Take
the other left wing and add some glue on the stamped side (still on the
bottom part) and stick it to the back of the circle, near where you
placed the other wing.
Make the other one the same way, using the right wings.
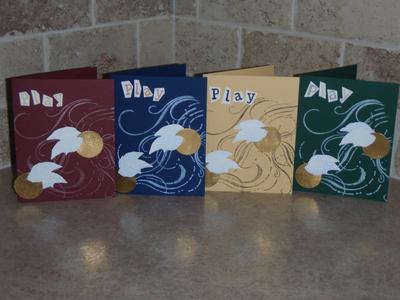
 Once you have assembled your two snitches, stick them onto your card using the image below for placement.

Author's Note: You can have a part of the snitch stick out of the card a bit, as though it was flying out of it. Please note that if you do this, the snitch is more likely to fall off in the envelope.
Add some tape glue to the back of the letters, and stick them unevenly in the top-left corner of your card.
Put in an envelope and send via owl or Muggle post¦ or hand in person to your favorite wizard or witch!
Final Product
Credit
Josée Leblanc's (a.k.a. Josée~Madalia) tutorial was taken with permission from Harry Potter Crafts on Yahoo! Groups.


