Supplies
Wooden box with glass top and sides
Screwdriver
Tape
Black paint
Decoupage medium (such as ModPodge)
Fake leading and stained glass paints (such as Plaid)
Note: The author used ivy green and glitter silver, but thinks she will not use the silver again as it had much less of the stained glass look she wanted and more of a paint-y look.
Dark Mark picture or some other picture that you'd like to use. (The author used a Dark Mark tattoo as her basic pattern)
Pictures to be decoupaged. (The author's came from Makani's art.)
General supplies: brushes or sponges, Exacto knives or good scissors, tape, something to measure
Instructions
Take apart a wooden box and move the hinges, screws, and findings somewhere that you won't lose them.
Paint all of the wood; use lots of tape to try to keep it neat and to avoid getting it on the glass. Use several coats, allowing time to dry in between.
Measure the center on each side of the top. Mark this point by taping each of the sides and then marking the center of the tape with a pen or pencil. Cut out the Dark Mark (or other picture that you would like to use) and mark the center of the top, bottom, and sides. Line these up with the center of each of the sides of the box. Tape firmly in place.
Carefully trace only the outline of the Dark Mark. Allow the leading to set up for several hours. Be patient - this smudges quite easily!
Once the outline has completely dried, begin to carefully trace the details. Trace only a few in each area at a time, then allow the designs to dry completely before adding other details. Again, this smudges easily and you are working with small designs.
After the leading has dried, add the stained glass color. Trace the edges of the leading first and allow that to dry. Once it has, fill in the inner portions of the design. The final product will look MUCH better if you paint in little swirls rather than straight lines; it looks less like an easy craft and more like actual stained glass.
While you wait for the various levels of fake leading and stained glass paints to dry, begin working on the other details of the box. You can work on the top or sides at the same time you are decoupaging the inside, doing one while the other dries. Carefully cut out the pictures that you have chosen to decoupage on the inside. After the paint has dried fully, cover the bottom with your first coat of decoupage medium. If you do not wait for the paint to dry entirely, it will mix with the medium and color your pictures slightly. Carefully lay out the pictures where you would like them to go. If pictures are to overlap, lay down only the bottom layer to begin. If you have printed your own images, it's best to dab on the first layer of the medium rather than using a normal painting technique so the ink from the printer does not smear across the design. This is especially important if the image uses a lot of ink as mine did. Once you've attached all of the pictures, add another three or four coats of decoupage medium so that the bottom would be a bit more smooth. Let the first coat dry before you apply another.
Once you have finished all of the painting, tracing, and decoupaging, re-attach the hinges and findings.
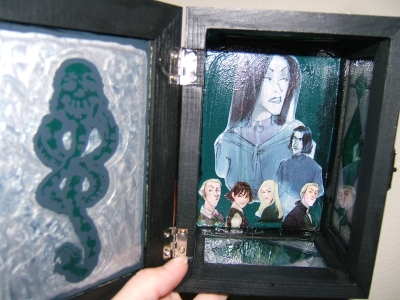
Final Product

Credit
© Melissa Lawson's pattern was taken with permission from mlwl.livejournal.com


