Supplies
Wooden dowel the length that you want your wand.
Suede lacing
1 bowl of warm water
1 bead with a large hole
1 nail that fits through the hole in your bead and is about ½" (1.27 cm) longer than your bead
Wood stain
Hammer
1 small piece of leftover candle
Heavy duty glue
Sandpaper
Scissors
1 clothes pin or small clamp
Paper towels
1 large rag
Cotton swab
Something to protect your tabletop
Instructions
Using sandpaper, taper the wooden dowel toward one end and round off the tip.
Rub wood stain into the dowel using a paper towel. Allowing drying time between coats, repeat until you get the color you like.
Rub all over the wand with your leftover candle. If your wood stain has a built in sealer, skip this step. Use the rag to burnish the wax into your wand.
Put your suede lacing into the bowl of warm water and let it soak for 1 minute. When you think it is soft enough take it out and squeeze it out in your rag.
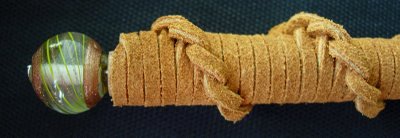
Begin the knotting by placing one end of the suede lacing on the end of your wand and wrapping the suede lacing around it twice to cover the end.
Take the suede lacing and cross it over the front of your wand. Go behind the wand with the suede lacing and come out the loop on the right side of the wand.
Making sure that the suede lacing stays flat and does not twist, pull tightly away from the knot and then back towards it to get it close to the knot before it.
You will want to keep each knot up against the one before it tightly. The leather will shrink some when it dries to if there are gaps when its wet the gaps will be even bigger when its dry. The image on the left shows the wrong way to do it, the picture on the right shows the proper way.
Continue making knots until the handle is as long as you want it, making sure that you are crossing the suede lacing over the top of the wand in the same direction every time.
When your handle is the desired length, wrap the suede lacing around about 4 times, making sure to keep everything snug. Using the clothes pin or small clamp, clamp the suede lacing down to dry.
Allow the suede lacing to dry overnight. Once it is dry, remove the clamp and peel back one wrap of the lacing. The lacing should be formed permanently into coils at this point. Apply a small amount of heavy duty glue and re-wrap the coil around it, pulling it tight. Use a cotton swab or your fingertip to take off any glue that oozes out when you re-wrap it. Put the clamp back in place for a few hours until the glue is dry, then remove the clamp and snip off the lacing close to the handle.
Fold up your rag as many times as you can.
Put the rounded tip of the wand on your padding. Holding the bead on the nail, place the nail tip on the flat end of the wand. Lightly tap the nail in with the hammer, making sure to keep the tip of the wand pushed down into the padding.


Final Product
Credit
© Pren Wilcox's tutorial was taken with permission from wilcoxwizardwears.blogspot.com.


