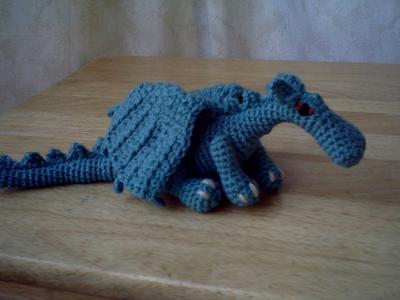
Final Product
Supplies
E/4 (3.50 mm) hook
Yarn in the weight and color of choice
Small amount of cream or beige yarn
Stitch marker
Yarn needle
Abbreviations
inc 2 = do 2 sc in one stitch.
dec 2 = reduce 2 stitches down to one sc.
sc = single crochet
FO = finish off
st = stitch(es)
ch = chain
yoh = yarn over hook
ss = slip stitch
hdc = half double crochet
dc = double crochet
Instructions
Author's Note: Crochet tightly so that the stuffing won't show, and stuff the body as you go along, not too tightly so that the dragon can bend its neck and tail.
Nose
8 sc in magic ring or ch2, 8 sc in second ch from hook, FO leaving a bit of a tail. (nostril 1)
8 sc in magic ring (nostril 2), then sc into any stitch on the first ring and go all the way around both of them, ending up with 16 st.
Use the tail from nostril 1 to sew up any gap between the 2 parts.
Continue without finishing off to the next step.
Body
Sc 16.
Decrease 2 stitches, one at the top middle of the nose and one at the bottom middle of the nose. (14 sc)
Sc 14.
Decrease 2 stitches, again at the top middle and bottom middle of the nose. (12 sc)
Decrease 2 stitches, again at the top middle and bottom middle of the nose. (10 sc)
Increase 4 stitches at the top to create the head. (14 sc)
Sc 14.
Sc 14.
Decrease 2 at the top. (12 sc)
Decrease 2 at the top. (10 sc)
Decrease 2 at the top. (8 sc)
Sc 8.
Sc 8.
Increase by one stitch anywhere. (9 sc)
Increase by one stitch anywhere. (10 sc)
Sc 10.
Sc 10.
Increase by one stitch anywhere. (11 sc)
Increase by one stitch anywhere. (12 sc)
Increase 6 stitches at the bottom to create the body. (18 sc)
Sc 18.
(Sc in 2 st, 2 sc in next st) around. (24 sc)
Sc 24.
Sc 24.
Increase 2 st, one on each side. (26 sc)
Sc 26.
Sc 26.
Increase 2 st, one on each side. (28 sc)
Sc 28.
Decrease 2 st, one on each side. (26 sc)
Author's note: Make sure to do these side decrease in random spots on the sides, or there will be a distinct line.
Decrease 2 st, one on each side. (24 sc)
Decrease 2 st, one on each side. (22 sc)
Decrease 2 st, one on each side. (20 sc)
Decrease 2 st, one on each side. (18 sc)
Decrease 2 st, one on each side. (16 sc)
Decrease 2 st, one on each side. (14 sc)
Sc 14.
Decrease 2 st, one on each side. (12 sc)
Sc 12 for 10 additional rounds.
Decrease 1 st. (11 sc)
Sc 11 for 2 additional rounds.
Decrease 1 st. (10 sc)
Sc 10 for 2 additional rounds.
Decrease 1 st. (9 sc)
Sc 9 for 2 additional rounds.
Decrease 1 st. (8 sc)
Sc 8 for 3 additional rounds.
Decrease 1 st. (7 sc)
Sc 7 for 9 additional rounds.
Decrease 2 st. (6 sc)
Author's Note: If the tail doesn't look pointy enough, continue for 3 more rounds of 6 sc, then decrease 1 st (5 sc), and do 2 additional rounds of 5 sc.
Decrease 2 st. (4 sc)
Decrease 2 st. (2 sc)
Decrease 1 st. (1 sc)
Finish off and sew up when completely stuffed.
Back legs
Make 2.
6 sc in magic ring.
2 sc in each st. (12 sc)
Sc 12 for 3 additional rounds.
Sc 6, (dec 2) 3 times. (9 sc)
Sc 9 for 2 addtional rounds.
Sc 6, (inc 2) 3 times. (12 sc)
Sc 12.
(Sc 1, 2 sc in next st) around. (18 sc)
Sc 18 for 2 addtional rounds.
Sc 3, (dec 2) twice, sc 4, (dec 2) 3 times, 1 sc. (13 sc)
Sc 2, (dec 2) twice, sc 2, dec 2, 1 sc, dec 2. (9 sc)
(Sc 2, dec 2) twice. (7 sc)
Repeat (sc 2, dec 2) until the hole is too small to do any more.
Stuff, then use cream or beige yarn to sew claws onto the foot.
Sew up top of leg.
Front legs
Make 2.
5 sc in magic ring.
2 sc in each st. (10 sc)
Sc 10 for 3 additional rounds.
Sc 6, (dec 2) twice. (8 sc)
Sc 8 for 6 additional rounds.
(Sc, dec 2), repeating every round until the hole is too small to do any mo0re.
Sew up top of leg.
Spikes on back
Author's Note: Spikes are made continuously. Make 3 small, 10 large, 3 small, missing out the last ch1 and leaving a tail of yarn to sew to the body. Adjust the number of spikes you make to fit along your dragon's back from behind the eyes to the tip of the tail.
Small
Ch 3, sc into 2nd ch from hook, hdc into 3rd ch from hook, ch1.
Large
Ch 3, sc into 2nd ch from hook, yoh, insert hook into next ch, yoh and pull through st, yoh, pull through 2 loops, yoh, insert hook into same st, yoh and pull through st, yoh and through all loops on hook, ch1.
Wings
Row 1: Ch 16.
Row 2: Skip 1st ch, 3 ss, 5 sc, 7 hdc, ch 2, turn.
Row 3: 7 hdc, 5 sc, 3 ss, ch1, turn.
Row 4: 3 ss, 5 sc, 7 hdc, ch 3, turn.
Row 5: Skip 1st ch, 2 ss (to make claws), 7 hdc, 5 sc, 3 ss, ch1, turn.
Row 6: 3 ss, 5 sc, 7 hdc, ch 2, turn.
Row 7: 7 hdc, 5 sc, 3 ss, ch1, turn.
Row 8: 3 ss, 5 sc, 7 hdc, ch 3, turn.
Rows 9-12: Repeat rows 5 ’ 8.
Row 13: Skip 1st ch, 2 ss, 15 sc.
Sc along the base of the wing and along the other side, ch3, turn.
Skip 1st ch, 2 ss to make last claw.
FO leaving long tail.
Use the tail to secure the last claw to the rest of the wing, then take thread through wing to its base, ready to sew onto the body.
Ears
Leave a long tail of yarn when you make your first loop.
Ch 6, turn.
Skip 1st st, sc, dc, sc, ss.
Leave the last ch and ss up the other side of the ear to the tip.
Finish off.
Sew onto the head, going over the last chain several times to create the brow bone shape.
Finishing
Sew the spikes along the back from just behind the ears to the tip of the tail.
Sew the legs on in the obvious positions by pulling the tail of yarn through and out of the side of the leg, at the top, then sewing the yarn several times into a small area on the body so that they are slightly jointed and can move about quite easily.
Sew on the wings slightly to either side of the spikes with the front edge about level with the front legs.
Embroider eyes with a diamond shape in a contrasting colour below the brow bone, then use black for the pupils so that they looked a bit like cat's eyes, or sew on beads for eyes.
If you want to use safety eyes, you'll need to fit them in quite early, before you crochet the neck, or you won't be able to fit them.
Credit
© Heavens-hellca. Tutorial was taken with permission from heavens-hellcat.livejournal.com.


