Supplies
1 skein of Patons Classic Wool Merino in Gold.
Small amount of white worsted weight yarn
1 set of US/10 (6.00 mm) DPNs
1 set of US/9 (5.50 mm) straight needles
Tools to create an i-cord
Fiberfill
Yarn needle
Gauge
In K2 P2 ribbing, 20 stitches = 4 inches (10.16 cm) on the DPNs.
In Stockinette Stitch, 12 stitches = 4 inches (10.16 cm) on the needles.
Instructions
Body
Make a small ball of yarn from your skein of gold yarn. Hold it on the side. Always slip the first stitch of the row; this creates a selvedge, oran edging of elongated stitches that are super easy to pick up again later, at the rate of 1 "selvedge" stitch per 2 rows of knitting. Anyway, if the instructions say K2 P2¦ it is really slip 1, K1,P2¦. Sorry but that's how my brain works.
With the larger skein of gold yarn, CO 26 stitches using the Provisional Cast-On.
Rows 1-41, odd: Slip 1, K1, P2, then (K2, P2) across ending on K2.
Rows 2-42, even: Slip 1, P1, K2, then (P2, K2) across ending on P2.
Bag Opening
Row 43: Slip 1, K1, P2, K2, P2, K2, P2, K1, drop yarn. Leaving a 4 inch (10.16 cm) tail, use the small ball of gold yarn to K1, (P2, K2) to the end.
Rows 44-84, even: Continue using the small ball of gold yarn to work the first half of the stitches in P2, K2 ribbing, continuing to do Slip 1, P1 in place of the first P2. Drop the yarn and use the larger skein of gold yarn to continue working the ribbing the rest of the row.
Rows 45 - 83, even: Use the larger skein of gold yarn to work the first half of the stitches in K2, P2 ribbing, continuing to do Slip 1, K1 in place of the first K2. Drop the yarn and use the small ball of gold yarn to continue working the ribbing for the rest of the row.
Author's Note: You are trying to knit 2 separate yet equal panels, so that overall your piece willlook like a Y.
Rows 85: Using the larger skein of yarn from this point on, slip 1, K1, (K2, P2) across ending on K2.
Rows 86 ’ 126, even: Slip 1, P1, K2, then (P2, K2) across ending on P2.
Rows 87 ’ 127, odd: Slip 1, K1, P2, then (K2, P2) across ending on K2.
Row 128: Using the three needle bind-off, bind off the live stitches on your needle and the live stitches that you created withyour provisional cast on.
You now have a very shallow cylinder shape, or a fat coin. Turn the cylinder on its side like so:
Filling in the sides of the bag
Row 1: Turn the cylinder shape so that the nice selvedge edges are now parallel to the ceiling and floor. Using your DPNs, pick up 64 stitches through the elongated knit stitches of the selvedge.
Author's Note: That is 1 stitch picked up per elongated selvedge stitch, or 1 stitch per 2 rows of knitting.
Row 2: Working in the round, [K 6, K2tog] 8 times. (56 stitches)
Row 3 and all odd-numbered rows: K each stitch around.
Row 4: [K 5, K2tog] 7 times. (48 stitches)
Row 6: [K 4, K2tog] 7 times. (40 stitches)
Row 8: [K 3, K2tog] 7 times. (32 stitches)
Row 10: [K 2, K2tog] 7 times. (24 stitches)
Row 12: [K 1, K2tog] 7 times. (16 stitches)
Row 14: K2tog 7 times. (8 stitches)
Row 15: K in each stitch.
Break yarn leaving 2 inch to 3 inch (5.08 cm to 7.62 cm) tail.
Draw through each stitch on the DPNs, then pull the tail to tighten.
Weave in the tail.
Flip the bag body over so that the other selvedge edge is facing up.
Repeat rows 1 ’ 15 on that side.
When you are done, weave in all loose pieces of yarn from the bag.
Handles
Make 2 18 inch (45.72 cm) lengths of i-cord using the gold yarn and DPNs.
Attach 1 to each side of the bag.
Wings
Make 2 7 inch (17.78 cm) lengths of i-cord using the white yarn and DPNs.
Lightly stuff them with fiberfill, making sure they remain bendable. These are the wing ribs and will give the wings structure.
Right Wing
CO 9 Stitches using the white yarn and straight needles.
Row 1: K4, P1, K4.
Row 2: P4, K1, P4.
Row 3: K4, P1, K2, K into the front and back of the stitch, K1. (10 stitches total)
Row 4: P1, K1, P3, K1, P4.
Row 5: K1, P1, K3, K into the front and back of the stitch, K1. (11 stitches total)
Row 6: P2, K1, P3, K1, P4.
Row 7: K1, P1, K3, P1, K into the front and back of the stitch, K1. (12 stitches total)
Row 8: P 3, K1, P3, K1, P4.
Row 9: K1, P1, K3, P1, K1, K into the front and back of the stitch, K1. (13 stitches total)
Row 10, 12: P4, K1, P3, K1, P4.
Row 11: K4, P1, K3, P1, K4.
Row 13: BO4, K4, P1, K4. (9 stitches total)
Row 14: P4, K1, P4.
Row 15: K4, P1, K4.
Row 16: P4, K1, P4.
Row 17: BO4, K5.
Row 18: P5.
Row 19: K5.
Row 20: P5.
Row 21: BO5.
Left Wing
CO 9 Stitches.
Row 1: P4, K1, P4.
Row 2: K4, P1, K4.
Row 3: P4, K1, P2, P into the front and back of the stitch, P1. (10 stitches total)
Row 4: K1, P1, K3, P1, K4.
Row 5: P1, K1, P3, P into the front and back of the stitch, P1. (11 stitches total)
Row 6: K2, P1, K3, P1, K4.
Row 7: P1, K1, P3, K1, P into the front and back of the stitch, P1. (12 stitches total)
Row 8: K3, P1, K3, P1, K4.
Row 9: P1, K1, P3, K1, P1, P into the front and back of the stitch, P1. (13 stitches total)
Row 10, 12: K4, P1, K3, P1, K4.
Row 11: P4, K1, P3, K1, P4.
Row 13: BO4, P4, K1, P4. (9 stitches total)
Row 14: K4, P1, K4.
Row 15: P4, K1, P4.
Row 16: K4, P1, K4.
Row 17: BO4, P5.
Row 18: K5.
Row 19: P5.
Row 20: K5.
Row 21: BO5.
Assembling the Wings
The side with more Knit stitches showing is the right side of each wing, even though 1 wing is knitted backwards from the other.
Stitch the top and right edges of the right wing to one wing rib.
Repeat for the left wing.
Attaching the Wings
Sew the wings to the bag, placing them about a half inch (1.27 cm) below the opening of the bag and centered on the ribbing panel.
Weave in all yarn tails.
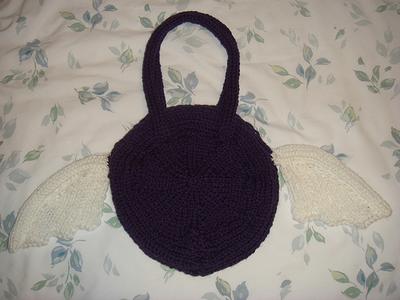
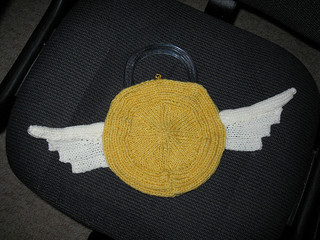
You are finished. Congratulations! Now make sure your mugglefriends don't steal your snazzy new project bag!!
Final Product
Credit
Kim Strauss' tutorial was taken with permission from ravelry.com.


