Supplies
Polymer clay in navy, silver, white, brown & yellow
Toothpicks
AA battery, for size comparison
Scissors or craft knife
Pasta machine or rolling pin
Instructions
Mix white, brown and yellow clay until you get a color that you like, making sure that you have enough of it for the head and the hands.

Mix the silver and white clay to create the hair color.
After separating all of the colors, you should have balls that are roughly the same size as in Figure 2 below.

Body
Roll out the navy clay into a log that is just larger than a AA battery.

Set the body upright and squash it down a little.

Head
Roll out a head from the flesh tone that is about as wide as the body.

Arms
Break off two small rectangles of navy clay and roll into a long,thin arm shape.
Smooth the shoulder out so that it is connected with the body.
Leave the ends of the arms far enough apart that you have room for the hands and a wand.

Beard & Mustache
Roll out a thin rectangle of the hair color and, using scissors or a craft knife, cut out a small triangle from it.
Press the triangle onto the head to connect the beard.
Cut two more triangles and attach them above the beard for a mustache.

Wand
Using the brown clay, roll out a wand shape.
Use a toothpick to add texture to the wand.
Lay the wand across the figure's chest, over the beard.

Hands
Take a small, oblong piece of the skin color and fold it so that it is a "U" shape.
Place these "hands" over the wand.

Attaching the head to the body
Cut a toothpick in half.
Shove the blunt end of the toothpick through the figure's body, so that the sharp point is where the head should be.
Place the head over the sharp point and press down.

Hair
Roll out a large, thin rectangle of the hair color, making it as wide as you wish the figure's hair to be long.
Using scissors or a craft knife, cut the rectangle into triangular strips.
Place the wide ends of the strips on top of the figure's head arranging them so that the head is covered.
Use your fingertips to curl up the ends up and in towards the figure's hair.
Push the strips of hair by the figure's face behind his shoulder to give the hair a nice "woosh" effect.

Finishing
If you'd like, paint some glasses on your figure.
Bake your figure according the the manufacturer's directions on your clay package.
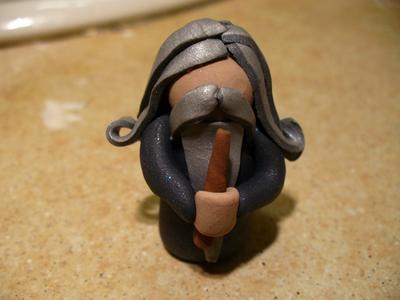
Final Product
Credit
nothing-but-a-dream's tutorial was taken with permission from paperfaceparade.deviantart.com.


