Supplies
Paper wand tutorial
UV ink marker
UV LED key-ring light
Soldering iron
Solder
Drinking straw
6V camera battery 4LR44
Plastercine, blu-tack, corrugated or foam core cardboard
Hot melt glue gun
Hot melt glue
Tape
Hole punch
Permanent marker
2 small paper clips
Sandpaper, or an emery board
1 sheet of A4 or US letter sized paper
Double-sided tape
Scissors
Acrylic paint in desired colors
Spray paint in desired base color
Gold rubbing paste
Instructions
Take the LED key ring light apart.
Make sure to note which of the LEDs legs is touching the positive battery terminal. If the leg is bent, it might need straightening out to fit inside a drinking straw.
Author's Note: The batteries which come with most keyring lights are CR2016 (that's 20mm diameter and 1.6mm thickness). I felt that the diameter of 20mm was too much for a wand handle so i looked around for a narrower 6 volt battery. The best i found was the 6V camera battery 4LR44. As all our joins to the battery are going to be by taping the wires on the less batteries we have to join together the better, so a single battery for the whole 6v is what you want.


Author's Note: To make it easier to solder, push the LED upside down into a piece of plastercine, blu-tack, corrugated or foam core cardboard. That way it is held steady while you concentrate on the soldering.
To get a good solder join, tin the wire by holding the soldering iron on the wire and touching the solder on to the wire as well. When the wire is hot enough, the solder will melt and run along the strands of wire solidifying them together.
WARNING!! Handle the soldering iron with extreme care as they get very hot and will burn you easily and badly, and will make holes in tables and carpets if knocked off their stands when hot. Also never pick a soldering iron up by the metal bit, you just don't know if it is still hot or not... always use the handle.

Thread the wires through the drinking straw, filing the flange of the LED to get it to fit in the drinking straw if necessary.
Just before you slide the LED in put a small blob of glue gun glue in the end of the straw to hold the LED in place.
You can put a blob of glue at the other end too just to make sure that it is all nice and secure.

Author's Note: We are going to be sticking the wire on the end of the battery using tape to hold it in place. As this is a rather rough and ready way of attaching a wire to a battery, it is a good idea to insulate the rest of the battery to make sure that the wire doesn't slip and short across to the metal casing of the battery.
Cut a hole in a piece of tape, sticky side up, using a hold punch.

Insulate both ends of the battery with tape, remembering to mark which end is positive and which is negative using a permanent marker or two different colours of insulating tape.

Attach the wires to the battery by coiling up a bit of the bared end of the wire and placing it over the bare battery terminal.
Hold it firmly in place by pulling tape hard over the top of it.

Connect both wires and the strap to the battery sides, making sure that the positive battery terminal is wired to the positive leg of the LED, that the negative terminal is wired to one half of the switch, and that the negative leg of the LED is wired to the other half of the switch.
Take each wire from the battery and double it back over the battery.
Strap it to the battery side with even more tape. This doubling back is to make sure that it is not easy to pull the wires directly off the battery terminals.

Roll up a piece of paper to get a taper, so that the big end is tight around the battery and the little end is as tight as possible around the straw without it all wrinkling up.
Start by folding the corner over and start by rolling it round the wires, as shown in the picture.
It really helps to have a couple of strips of double sided to help keep things in place while the glue is setting. DO NOT put too much glue on, it takes ages to dry and is not needed.
Try and aim to get the end of the straw lined up with the end of the paper.
Be careful of the wires don't let them be twisted too much nor strain against the contacts.

The end should protrude from the wand.

Using a strip of double-sided tape to hold it in place, cut out and roll up a corner of paper so that the tip of the wand is covered right down to the LED.

Being very careful not to cut the wires, trim the larger end straight.
The thin end will already be nicely wrapped and straight so will not need trimming.

To make the switch, take two little paper clips and gently bend them out before re-bending them into the shapes shown.
The little end bits are for soldering to and these should be roughed up a bit with sandpaper or an emery board.
To make the hoop, bend the wire around a stick or handle of the same diameter as the larger end of the wand.

Solder the wires to the solder tabs.
For each solder tab, cut a small V-shaped hole in the top of the large end rim.
When you have soldered the wire on to the solder tab of the paper clip, rest the paper clip down into the V-shaped cut out and secure with a small blob of glue gun glue.
Do the same for both paper clip parts, making sure that they don't touch at the top.

To set the switch gap, put a small blob of glue gun glue under the top of the straight paper clip and while it is still hot hold it so that it is spaced off the hoop of the other clip. There should be a 1mm to 2mm gap. Let the glue set. now you can try your switch.

Roll a small bit of tissue into a small ball and pack the wand with it.
Then fill the end in two or three stages, making sure to allow the glue to cool a bit in between each filling.
For the last bit make sure that the end bulges slightly so that the finish is nicely rounded.
Author's note: If you go over the metal of the switch it might heat up the previous glue you did there and the switch might relax its position and touch the other contact. This is not a problem, just be aware that you might have to support the switch while the glue sets again. You could put a scrap of card between the switch contacts to stop them touching while the glue is setting.

Use the directions from the paper wand tutorial to add surface detail to the wand, hiding the switch part so that no one will guess the more Muggle working of the magical device.

Decorate your wand using the paper wand tutorial, taking care not to paint over the LED or switch contacts.

Revealing Your Secrets
When using the wand, remember to Swish and Flick and while holding it feel how you can press the switch without anyone noticing.
Say Lumos, or if it is dark say Lumos Maxima.
Very good! Now you are ready for the much harder charm, "Reveal your Secrets".
Experienced wizards know that for this to work, they first have use the UV marker and draw or write a design that they will later want to reveal.
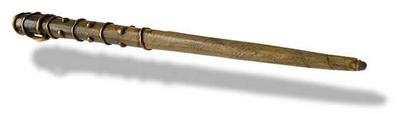
Final Product

Credit
© Chris Barnardo's tutorial was taken with permission from dadcando.com.


