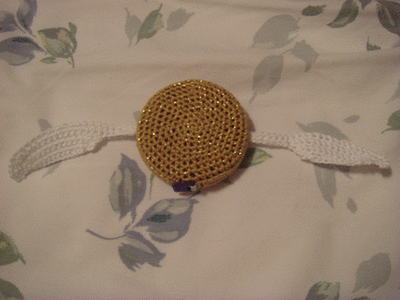
Final Product
Supplies
- 2" (5.08 cm) diameter tape measure
- US 7 (1.65 mm) steel crochet hook
- Size 10 crochet thread in gold
- Size 10 crochet thread in white
- Stitch holder
- Yarn needle
Gauge
At the end of row 9 your piece must be nearly 2" (5.08 cm) across. Slightly small is better than too big because it will stretch a little and you want a snug fit. If you achieve that with just 8 rows, skip rows 9 and 14. If you need an extra increase row 9.5, just add a row 13.5 of decreases: (SC in next 8 Stitches, SC2TOG) around.
Instructions
- Using the gold crochet thread, ch 3 and join with sl st to form a ring.
- Row 1: 6 sc in ring. Do not join.
- Row 2: 2 sc in each sc. (12 Stitches)
- Row 3: (Sc in next sc, 2 sc in next sc) 6 times. (18 Stitches)
- Row 4: (Sc in next 2 sc, 2 sc in next sc) 6 times. (24 Stitches)
- Row 5: (Sc in next 3 sc, 2 sc in next sc) 6 times. (30 Stitches)
- Row 6: (Sc in next 4 sc, 2 sc in next sc) 6 times. (36 Stitches)
- Row 7: (Sc in next 5 sc, 2 sc in next sc) 6 times. (42 Stitches)
- Row 8: (Sc in next 6 sc, 2 sc in next sc) 6 times. (48 Stitches)
- Row 9: (Sc in next 7 sc, 2 sc in next sc) 6 times. (54 Stitches)
- Rows 10 ’ 12 : Sc in each sc (54 Stitches), ch 1, turn.
- Row 13: Sc in each sc. Do not turn.
Enclosing the Tape Measure
- After you do the first 3 stitches of Row 14, you need to put the cover around the tape measure.
- First, pull out a few inches of the tape to give yourself some slack.
- Then slip the plastic piece on the end of the tape through the hole in the cover.
- Be careful not to tear anything!!
- It will be a snug fit but should go through, and if it doesn't just rip the last 3 stitches and try crocheting a bit looser.
- Row 14: (Sc in next 7 sc, sc2tog) 6 times. (48 Stitches)
- Row 15: (Sc in next 6 sc, sc2tog) 6 times. (42 Stitches)
- Row 16: (Sc in next 5 sc, sc2tog) 6 times. (36 Stitches)
- Row 17: (Sc in next 4 sc, sc2tog) 6 times. (30 Stitches)
- Row 18: (Sc in next 3 sc, sc2tog) 6 times. (24 Stitches)
- Row 19: (Sc in next 2 sc, sc2tog) 6 times. (18 Stitches)
- Row 20: (Sc in next sc, sc2tog) 6 times. (12 Stitches)
- Row 21: Sc2tog 6 times.
Finishing
- To finish off, insert your hook into each of the 6 remaining stitches and pull up a loop, using a stitch holder to hold the stitches.
- Cut yarn with a 2" (5.08 cm) tail, and draw the tail through the 6 loops, tightening evenly.
- Tie off and weave in ends.
Wings
- With the white thread, ch 26, leaving a 3" to 4" (7.62 cm to 10.16 cm) tail of yarn.
- Row 1: Sc in 2nd ch from hook and in each ch across. (25 sc)
- Row 2: Ch 1, turn, sc in next 18 sc, sc2tog 3 times, sc in last sc.
- Row 3: Ch 1, Turn, sc in next sc, sc2tog, sc in next 13 sc, sl st in next sc.
- Row 4: Ch 1, turn, skip first sc, sc in next 13 sc, sc2tog, sl st in final sc.
- Row 5: Ch 1, turn, sc in next 12 sc, sl st in final sc.
- Finish off and weave in the end.
- Repeat for second wing.
- Using the 3"-4" tails from the foundation chains, attach the wings to each side of the snitch.
Credit
Kim Strauss' tutorial was taken with permission from ravelry.com.


