Ingredients
1 round cake,
1 batch standard buttercream frosting
Food coloring in green, black and red
3 pastry bags
Decorating tips: #1, #9, and #70
Plate
Scissors
Butter Knife
Toothpick
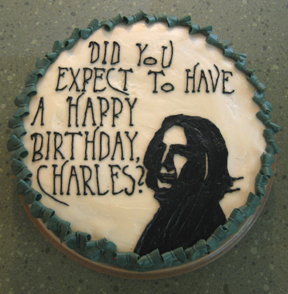
Silhouette image of Snape
Message of your choosing in a Potter-related font printed, for visual guideline
Instructions
Assemble the cake on the base or plate.
Frost it as smoothly as you can with the untinted buttercream.
Set aside remaining frosting.
Carefully cut out the image of Snape, ensuring removal of all white areas of the paper.
Place the cut-out image of Snape on the cake where you would like it to appear.
Use a toothpick to carefully trace around it and then remove the paper from the cake.
Tint about a 1/2 cup of the remaining frosting black, a very small amount red, and the rest with a green/black mix to get a good Slytherin dark green. If the frosting is stiff, soften it in the microwave so that it will flow easily.
Fill the pastry bag with black frosting, using the #1 tip.
Follow the toothpick markings to create the Snape outline, and then carefully fill it in.
Place the cake in the refrigerator for a while to harden the icing.
Take the cake out again, and carefully use the tip of a butter knife to smooth out the texture of the filled in shape.
Use the toothpick freehand to write the message on the cake, then copy the font with the frosting as best you can. This part was very tricky and took the longest time to do. If you don't want to be bothered, you can just write the message in muggle lettering.
Fill the other pastry bag with the dark green frosting, using the #70 leaf tip.
Pipe a border around the top edge of the cake as follows: hold the bag vertically and squeeze as you pull up slightly, creating a base. Then ease up on the pressure, tip the bag down 90 degrees, and stop the pressure completely while pulling the bag away. This should create a green shape which could either be a ragged leaf or a green snake tongue. Repeat that shape all the way around the top edge of the cake.
Change the tip on the green pastry bag to the #9 large tube tip.
Starting with the head, pipe a snake on the side of the cake, about 2 1/2" long as shown in the picture.
Repeat the snakes all the way around the side of the cake.
Use the black frosting to make eyes for all the snakes.
Fill the other pastry bag with the red frosting, washing out the #1 tip to use for the red.
Make tongues for the snakes all the way around the cake side.
Final Product
Credit
Melissa Ray's tutorial was used with permission.


