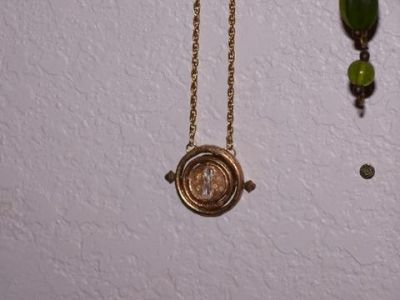
Final Product
Supplies
2 keychain rings (make sure one is bigger than the other)
2 nicely shaped beads
Head pin or looped ear wire (or normal wire)
Micro beads (optional)
4 small beads (make sure they both fit between your two rings)
2 teardrop-shaped glass beads or an hourglass charm
Wire
Sculpey
Glitter
Instructions
Using head pins or looped ear wire (or normal wire), attach, at 3 and 9 o'clock, one of the outer beads (use the nicely shaped ones), to the big keychain, then to a small bead, then to the small ring. If the wire won't turn the small ring, wedge a bit of the Sculpey or micro round beads in the big keychain ring at each contact point , to force it apart, just a bit, and allow room for the wire to turn. The wire will then fit into the bead holes rather than being pinched by the ring. Repeat on the other side.
Put the jump rings in place by pushing them into the splits of the biggest ring, approximately at 11 and 1 o'clock.
At 6 and 12 o'clock, attach the head pins or looped ear wire (or normal wire) to the small keychain ring, then to a small bead. If you are using an hourglass charm, tie the wire around the charm as well.
If you are using teardrop-shaped beads, tie them together with a little bit of wire (make sure it's not obvious, as you will have to cover it with Sculpey). Using Sculpey, make a disk around the hourglass charm or the teardrop-shaped beads, making sure to cover the wire with Sculpey if using the latter. Make sure your disc is just small enough to fit in between the small beads attached to the pins or wire, and that the Sculpey completely covers the wire/pins.
If the wire won't turn the hourglass disc, wedge a bit of the Sculpey or micro round beads in the small keychain ring at each contact point, to force it apart, just a bit, and allow room for the wire to turn.
Carefully apply a layer of Sculpey over the keychain rings (fill the splits likewise) and in the space between the smallest ring an the charm or teardrop-shaped beads.
Bake according to the package instructions, then make the final retouches if necessary.
Finish off your timeturner by adding a bit of glitter.
Credit
Astra's tutorial was taken with permission from HarryPotterCrafts.


