Supplies
US 4 (3.5mm) DPNs
MC: Araucania Nature Wool Worsted, maroon (shade 34)
CC: Araucania Nature Wool Worsted, gold
Stitch marker
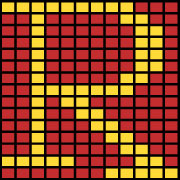
Chart
Finished Measurements
5” (12.7 cm) tall, 2.75” (7 cm) wide
Instructions
Body
Using MC, cast on 36 stitches
Divide 18 sts on 1st needle, and 9 sts on 2nd and 3rd needles.
Rounds 1-6: Knit
Round 7: *k1, k2tog, yo. Repeat from * 11 times
Rounds 8-28: Knit
Place sts from 2nd & 3rd needles on stitch holder.
Front
Rows 29-43: Work pattern with CC (3 sts on either side of pattern), working in stockinette stitch. The pattern uses an “R” for Ron Weasley, you can create your own initial pattern 12 sts wide by 15 rows tall.
Row 44-46: Continue in stockinette
Row 47: RS facing, k7, BO 4, k7. Place first 7 sts on stitch holder.
Front (left)
Row 48 (front left): purl
Row 49: BO 1, k6
Row 50: Purl
Row 51: BO rem 6 sts
Reattach yarn to 7 sts on holder
Front (right)
Row 48: k7
Row 49: BO 1, p6
Row 50: Knit
Row 51: BO rem 6 sts.
Reattach yarn to 18 sts on holder
Back
Rows 29-50: Stockinette stitch
Row 51: BO all sts
Sleeves
Using MC, CO 12 sts (divide 4 sts on each needle)
Rounds 1-5: k1, p1 rib
Round 6: *k1, inc 1 by knitting into the front & back of 2nd stitch. Repeat from *, you should have 18 sts now
Rounds 7-22: Knit
Row 23: Turn work, begin working in straight stockinette. After 3-4 rows, you should be able to transfer all sts to one needle to make straight knitting easier.
Rows 24-38 :BO 1 st at beg of each row
Row 39:BO rem 4 sts
Make 2 sleeves
Collar
Using MC, pick up approximately 25 stitches around the neck line (after you've sewn all your pieces together)
Knit 2 or 3 rows in stockinette stitch then bind off all stitches
Drawstring Closure
I-cord for as long as you would like the strap to be. The author made hers about 12” (30.5 cm) for a wrist strap.
Thread drawstring in and out of holes along the bottom.
Finishing
For extra sturdiness, stockinette stitch a tiny rectangle about 0.5” x 1” (1.3 cm x 2.6 cm), sew each end to the middle, and pull drawstrings through the holes.
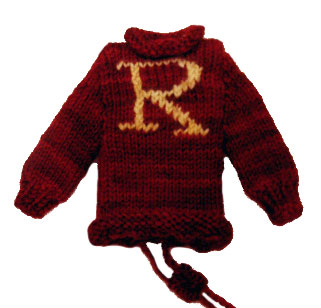
Final Product
Credit
Natasha's tutorial was taken with permission from Gritty Knits.


