This Weasley Sweater will fit ladies with a 38-40” (96.8-101.6 cm) bust. The finished sweater measures 44” (111.8 cm) around, so it should be roomy and comfortable.
The pattern is done in the round, so it's perfect for those who dislike seaming. Also, the author believes the roll at the bottom works best if done in the round. If you want to work the sweater flat, just cast on half the stitches and work from there.
Supplies
7 balls of Lion Brand Wool-Ease in MC
1 ball of Lion Brand Wool-Ease in CC
Note: You can also use any other worsted weight yarn that you can get the gauge with.
16” US7 (4.5 mm) circular needles
US8 (5.0 mm) circular needles, long enough to hold all the stitches (29” or 73.7 cm)
2 stitch holders or seperate needles
Gauge
20 stitches per 4” (10 cm) and 28 rows per 4” (10 cm) using US8 (5.0mm) needles.
Instructions
Sleeves
Cast on 44 stitches on US7 (4.5 mm) circular needles. Work in k2p2 ribbing for 2 inches, or however long you like your cuff.
Switch to US8 (5.0 mm) circular needles. Work in st stitch, increasing 1 at each end of row every 4 rows 18 times, (80 stitches on the needle) then every 6 rows 11 times until there are 102 stitches on the needle.
If the sleeve is long enough for you, bind off all the stitches loosely. If you want it to be longer, just work straight until it's the length you want it. The width should be about 20.5 inches.
Body
Cast on 220 stitches on US8 (5.0 mm), and join in the round. Place a marker at 110 stitches to mark the side seam.
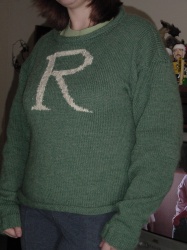
Work in st stitch until you reach the place where you want your initial to begin. The bottom hem should curl – it's supposed to.
At this point, you want to divide the back from the front and place the stitches on a holder/ separate needle. Depending on how you do your seams, you may want to add stitches at this point for a hem for the side seam, but you will have to take that into account for the rest of the numbers.
Note: When the author made this the first time, she kept going in the round until the sweater was 15” (38.1), doing the intarsia for those 2” (5.1 cm). She doesn't recommend doing that, since intarsia in the round will look differently from when you do it flat. Figure out how you want to seam up those two inches, and adjust accordingly. Or be brave and do the intarsia in the round.
Back
Continue working flat until it measures 25” (63.5 cm) from the hem.
Working from a wrong side row, purl across the first 36 stitches and place on holder. Bind off 38 stitches. Work across the remaining 36 stitches and place on another holder.
Front
Center your initial pattern on the front, and begin the intarsia to add the initial, following your particular chart.
Note: If you want to add a stitch or two for the hem side seam, feel free. The author's initial pattern was 42 stitches wide and 44 stitches high, so she had a 34-stitch border on each side of it. Yours might be different.
Once you have your initial there, continue to work flat, until the front measures 21.5” (54.6 cm) from the hem.
Neck Shaping
Knit across 49 stitches and join new yarn. Bind off 12, then knit until the end of the row. Work each side using separate balls.
Bind off at the neck as such: 5 stitches once, 3 stitches once, 2 stitches once, and 1 stitch 3 times until 36 stitches remain on each side, then knit until piece measures 25” (63.5 cm) from the hem.
Finishing
Sew the shoulder seams using the 3-needle bind off.
Pick up 100 stitches all around the neck using the smaller needle, and knit for 2 inches, then bind off loosely. The neckline is supposed to curl.
Attach the sleeves and seam where you need to. Now wash and block how you like it, and let dry.
Final Product
Credit
MA's tutorial was taken with permission from nsmom.net.


