Supplies
Butterick pattern #4259
Black fabric (pattern amount plus an extra yard/metre)
White fabric (pattern amount plus an extra yard/metre)
Instructions
Body of robe
Measure from top of shoulder where seam of a shirt is to about mid calf and add 1/2” (1.3 cm) or so.
On the pattern, cut or fold the front and back pieces however long you measured it.
Cut those pieces out of fabric.
Also, cut the same amount out of white fabric for the lining.
Sleeves
With your arm straight, out measure the top of the wrist to about your knee.
Measure from the top of your arm where your shoulder starts to halfway between the knuckles and wrist.
Take the pattern piece for the sleeve and place it on the fabric.
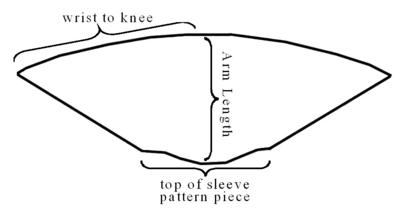
Using chalk or a fabric pencil, trace the top part where you sew it to the body.
However long you measured on your hand for the length put a small mark on the fabric for that length, making sure it is even with the center of the top of the mark you traced. From that center mark draw a half circle curve that is twice the length of your measurement to your knee.
From the corners draw a straight line to the top of the part you traced earlier.

Cut six 2 1/2” (6.4 cm) strips long enough for the sleeve.
With a 1/4” (0.6 cm) seam allowance on each side, sew the first strip 2” (5.1 cm) from the end of the sleeve.
Sew the second one on an inch (2.5 cm) from the first. Do the same with the third strip. Sew the second sleeve the same way.
Trace the final sleeve onto white fabric and cut it out for the lining.
Hood
The hood should reach a few inches above the tailbone.
Use the pattern piece from view C and place the top of it along the fold.
Add a few inches to the bottom where you sew it to the robe and using your measurements, make a mark on the fold to the length needed.
Draw a curve down to the extended bottom.

Note: You may want the opening of the hood to be bigger. The author's is about 16” (40.6 cm) when folded. To enlarge the opening, just lower the bottom of the pattern and adjust the curve to it.
Cut the pattern out of the black fabric and cut one out from white fabric for the lining.
Sew the pieces together as directed on the pattern instructions.
For the hood, sew along the curve and pin the two edges on the side. Pleat it at the very back as needed. Do the same for the white pieces you cut out.
Sewing the Hood and Robe Together
You should now have a black robe and a white one.
To sew the white lining, then put both robes inside out so right sides face each other and pin them together. Match the seams together so they fit and pin everything except the sleeve opening and about 1 1/2 ft (45.7 cm) at one of the bottom corners. With 1/2” (1.3 cm) seam allowance, sew the pieces together.
Turn that part inside out so the right sides of the fabric face out. Press it so that they lay flat. Whipstitch the opening at the bottom with transparent thread. Turn in the sleeve ends and pin it, making sure that white can't be seen poking out farther than black.
Depending on what color is facing up use one color in the bobbin and another threaded in the machine. The author tried both and ended up using the invisible thread in it.
Mark four holes evenly spaced where the string should go in the front to tie it closed based on pictures of Hooch.
Following the directions on the eyelet tools, put the eyelets in the holes.
Sew the Hogwarts patch on the left side and you're done!
Final Product

See also Jennifer's patterns for Madam Hooch's Quidditch Pads and Madam Hooch's Vest to complete this costume.
Credit
© Jennifer's pattern was taken with permission.


