Supplies
Branch or piece of wood a bit larger than you desire your finished wand to be
Sharp knife for carving
Sandpaper in each of three grades - rough, medium and fine
Polyurethane sealer
A Few Notes Before You Start
Hand carving your own wand isn't difficult. It just takes time and patience. Remember, the wands you see in the films are made of resin (from molds, easier to replace). Most of the ones you see offered for sale are machine made, or turned on a lathe. A hand carved wand will be a bit thicker, which means sturdier. It will also be unique; no other wand will come close in design.
Choosing Your Wood
The first step is to choose the branch or piece of wood to carve your wand from. Please think twice before cutting a branch from a living tree. You can damage the tree. It is best to use a branch that has already been pruned, will be pruned, or has come down in a storm naturally. Please don't take branches from parks or private property. You could even use a dowel rod if a branch is not available to you. Try to choose a branch that is no larger than 1" (2.5 cm) in diameter (less carving away to do) and not too thin. You have to allow for the wood you will remove. Also remember, the branch does not have to be perfectly straight. Twists, curves can add an extra dimension to your wand.
Wood Types
Please remember that different types of wood have varying degrees of hardness, meaning some woods are easier to carve than others. The beech branch the author carved was much easier to do than the sassafras.
Wand Length
Also keep the length of your wand in mind. If you want a 14 inch finished wand, make sure the wood you choose is a few more inches long than the finished wand will be.
Instructions
Trim your chosen branch to the proper length, then let the branch dry for a few weeks. The author preferred to let hers dry with the bark on.
While the branch is drying, it's a good time to study it, and to come up with a final design for your wand. If you are an inexperienced carver, remember the old adage KISS: keep it simple stupid. The more complicated the design, the more likely you are to mess it up. Choose the thicker end of the branch for the handle, and the thinner one for the tip of your wand.
Also take into account the properties of the wand. One of the author's wands has two 'eyes' on it. These were formed when I carved down the stubs of side branches level. The other wand had a natural twisting line up its length because of a vine that had grown into the wood. You can incorporate these into the design.
The first step in carving your wand is to have a good sharp knife. The author uses an inexpensive pen-kinfe that had a safety blade (won't fold up unless a button is pushed). It was kept sharp by using honing oil and a sharpening stone. One of the greatest safety tips is to use only a very sharp knife for carving.
Try to carve with the grain of the wood. Unfortunately this isn't always possible. Also, always try to carve away from yourself, not towards yourself, which reduces the risks of accidents.
Only carve away very small bits of wood at a time. Mistakes are easier to repair if they are small ones. Start by removing the bark (some woods have multiple layers). Basically, carve away the bits of wood that aren't wand. It might sound silly, but it works. Also, don't forget that you're going to be sanding the wand when you are finished. That will remove some of the wood and make the wand thinner in parts.
Make long shallow scraping type of cuts to remove wood (whittling), and deeper cuts for recessed areas. If you have nubs from removed side branches, whittle those down flush with the main wand. Remember, slow, steady, and small cuts.
Once you have gotten the shape of your wand down, it's time to begin the finishing process. Your first step is to use a rough grade of sandpaper. Smooth corners and other rough edges. When that is done, go to a medium grade of paper, and sand again. Finally, use a very fine grade of paper, and sand only with the grain of the wood. This will give you the smooth finish.
Clean the dust off of the wood with a damp cloth and let your wand dry. You should already have decided if you ant to stain the wood or leave it natural for finishing. The author stained one wand she made, but left the other natural to show off the grain of the wood. If you choose to stain the wand, follow the directions on the wood stain you choose.
Your final step will be to seal the wand with a polyurethane sealer. This can be a glossy or matte finish, your choice. This finish will protect your wand from dampness and some wear and tear. Again, follow the instructions on the wood sealer that you choose.
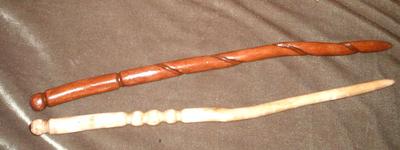
Final Product
Credit
© Martyne's tutorial was taken with permission.


